Installing a roof drip edge is crucial for the longevity of your roof, as it helps prevent water damage by directing water away from the roof deck and fascia. It’s an essential component for protecting your home’s structure and ensuring your roofing materials last longer. Whether you’re tackling a DIY project or hiring professionals, understanding drip edge installation fundamentals will give you confidence in the process.
Here’s what we’ll cover in this post:
- What is a roof drip edge and why it matters.
- Tools and materials you’ll need for drip edge installation.
- A straightforward, step-by-step guide for installing a drip edge.
By the end of this guide, you’ll not only know how to install roof drip edges but also understand how they safeguard your home.
❓ What is a Roof Drip Edge and Why is it Important?
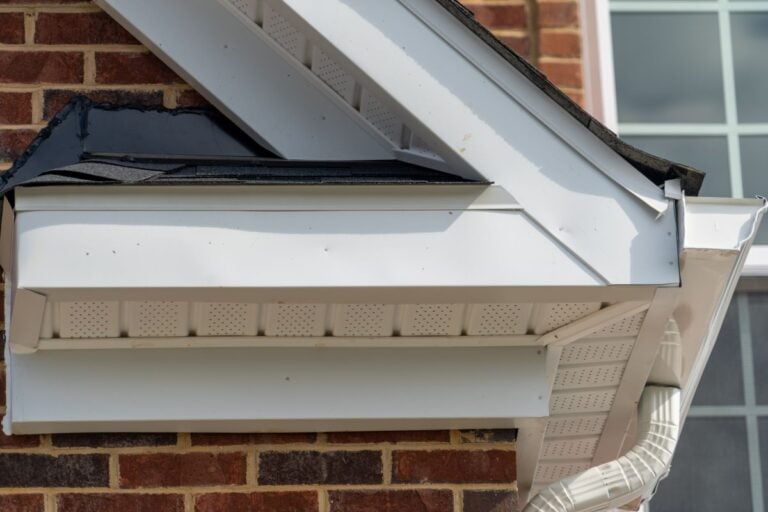
A roof drip edge is a metal flashing installed along the edges of your roof. Its primary role is to channel water away from your roof deck, fascia boards, and siding, protecting your home from potential water damage. Despite being a simple strip of metal, it has a huge impact on the durability of your roof and surrounding components.

Benefits of Roof Drip Edges:
- Water Diversion: Prevents water from seeping under your shingles and into the roof deck, which could cause rot or mold.
- Prolong Roofing Material Life: Protects the edges of roofing materials like asphalt shingles from curling or sagging.
- Structural Protection: Shields the fascia and siding from water damage, reducing repair costs over time.
Now that we’ve covered why you need a drip edge, it’s time to jump into the installation process. But first, gather the materials and tools you’ll need for the job.
🛠️ Tools and Materials You’ll Need
Before you start the installation, make sure you have these roofing materials and tools on hand:
- Roof drip edge flashing (in your preferred style and color)
- Roofing nails or screws
- Hammer or drill
- Durable tin snips or metal shears
- Measuring tape
- Chalk line
- Ladder and safety gear (harness, gloves, etc.)
- Roofing adhesive or sealant (optional, for extra reinforcement)
Once you’ve gathered the essentials, you’re ready to start the drip edge installation process.
📋 How to Install a Roof Drip Edge in 8 Steps

Follow these steps closely to properly install your roof drip edge and ensure a watertight finish.
1. Start with Safety First
Before beginning, make sure you’re equipped with the proper safety gear. Use a secure ladder, wear non-slip shoes, and have a harness if working on a steep roof. If you’re uncomfortable working at heights, consider hiring a professional roofing contractor to handle the installation.
2. Inspect and Prepare the Roof Deck
Ensure the roof deck is clean, dry, and free of debris. If there’s any damage to the edges of the roof deck (like rot or cracks), repair these areas before installing the drip edge. A sturdy and smooth deck provides a perfect foundation for proper installation.
3. Measure and Cut the Drip Edge
Using a measuring tape, measure the length of each roof edge where the drip edge will be installed. Then, use tin snips or metal shears to cut the roof drip edge material precisely. For corners, cut at a 45-degree angle to ensure a neat overlap.
4. Place the Drip Edge on the Roof Eaves
Align the first piece of the drip edge flush to the edge of the roof deck, starting at one lower corner of the roof overhang. The flat horizontal part of the drip edge should sit on the roof deck, while the angled vertical lip should hang over the fascia board.
5. Secure the Drip Edge Along the Eaves
Using roofing nails or screws, fasten the drip edge along the eaves. Place the nails about 8 to 10 inches apart to ensure it stays firmly in place. Avoid overtightening, as this could warp the metal. For extra protection, applying a roofing adhesive along the underside of the drip edge is optional for added security.
6. Install the Drip Edge on the Gable Ends
Once you’ve completed the eaves, it’s time to move to the gable ends. Start at the bottom of the roof and work upward, overlapping the vertical drip edge pieces at the corners. Ensure overlaps are approximately 2 inches to create a seamless barrier against water.
7. Check for Proper Overlapping and Securing
Inspect the overlaps between each section to ensure there are no gaps where water could penetrate. Use additional nails or adhesive if necessary to secure all pieces firmly.
8. Install Shingles Over the Drip Edge
Finally, begin laying your roofing shingles over the drip edge, following the manufacturer’s guidelines. Make sure the shingles extend slightly over the edge of the drip edge to maintain proper water runoff.
💡 Tips for Success in Drip Edge Installation
- Ensure Proper Nail Placement: Avoid placing nails too close to the edges of the roofing materials to prevent tearing during adverse weather conditions.
- Account for Weather Conditions: Install drip edges during calm, dry weather. Wind and rain can complicate the process and potentially lead to improper installation.
- Double-Check Overlaps: Gaps can compromise the function of the drip edge, so always double-check overlapping sections for watertight coverage.

❗️ Why Choose Springfield Roofing for Your Drip Edge Installation?
Installing a roof drip edge is an important step in protecting your home from water damage. While it’s a task that some DIY enthusiasts can handle, professional installation ensures the job is done right the first time. Here’s why Springfield Roofing stands out as the team you can trust:
- Expertise: Our team has years of experience installing drip edges and other roofing materials, ensuring your home stays safe and secure.
- High-Quality Materials: We use only the best drip edge materials to guarantee long-lasting durability and peace of mind.
- Customer-Centric Approach: At Springfield Roofing, we take the time to understand your needs and provide tailored solutions to protect your home.
- Safety and Professionalism: We prioritize safety and professionalism, completing every project with precision and care.
Water damage is no joke, and a properly installed drip edge can save you from costly repairs down the line. Trust Springfield Roofing for your drip edge installation needs and rest easy knowing your home is in expert hands. Contact us today to get started!